
Content-First Development: A Comprehensive Guide
If you’ve signed up for any of my freebies or the WP Project Manager’s Academy, then you know that I ask this question a lot.
“What are you struggling with most?”
Far and away the answer is… getting content from the client. So today, I’m going to show you a practical approach for getting that done. But we’re not going to cover only how to control the content part. We’re going to also cover content-first design versus content first development. They’re not the same thing. Watch the video below or read this article to find out what I mean.
Content-First Design vs. Content-First Development
Content-first design is when you consider the totality of the content before creating the design. And that makes sense, because the result is that you’re developing a design that best accommodates the content. Content-first development, on the other hand, is that you don’t build any of the website, outside of maybe a mock up or two, you don’t spend your valuable time doing development until the content has been received. And so the result is the same as the content first design… PLUS… it puts the proper resource in control, whether that’s the client or a third party or you. The project is less likely to stall and the development time is reduced significantly. And, best of all, you preserve your ROI because you’re not doing work that you’re not getting paid for.
And the other thing that I try to tell the new people is that you need to assign an hourly rate to your work. I’m not saying you need to advertise that to anybody. If you do value-based pricing, that approach is perfectly fine. But you need to know your worth. How are you valuing your worth for on that particular project by the hour? The reason being, that any hour (or portion thereof), that you spend on tasks that are not in your project plan and not in your estimate, well, you’re giving that away! You’re losing your ROI. Stop doing that.
I follow a content-first development approach. Nathan Ingram follows this approach and I’m pretty sure Melanie Adcock does too because it’s the only way to make sure that your clients adhere to the schedule.
Now it does seem weird that clients have problems getting content done on time. I know if it were MY business, and I was building a website, I would be focused on the website and I would do everything I could to meet the dates. But you have to understand that this is not the only project that your client has going on. They’ve got a business to run and things come up. So it’s not going to be top of mind unless you make it top of mind. It’s not going to be a priority, unless you make it a priority from the get go of the project.
It’s too late to do that when you’re in the throes of… Did you send the content? This isn’t the right format. That’s not what I asked for… and all of that stuff. When you’re in the throes of that, it’s too late. You have to do this at the very beginning of the project. You need to let them know what their responsibilities are in this project.
It’s Not the Client’s Fault
I get so frustrated with WordPress people who talk about their clients like they’re stupid. They’re not stupid. They’re just a bit ignorant. But that word has a bad connotation. What ignorant REALLY means is that you’ve never been told something. So you don’t really know.
After all, they are seeing all these TV ads about building a website in an hour, implying that building a website is not that hard. And they think they can just pass it off to you, go off, do their stuff, come back, and they’ve got a website. They just don’t realize that they need to be involved – UNLESS YOU TELL THEM.
I’m going to show you some techniques to take care of that.
The Payment Schedule that Doesn’t Work Anymore
So think about this for a minute. How long would it actually take you to build a website if everything was defined, and everything was waiting for you to plug into the site? Like pulling things off a shelf?
I already know the answer – not very long at all.
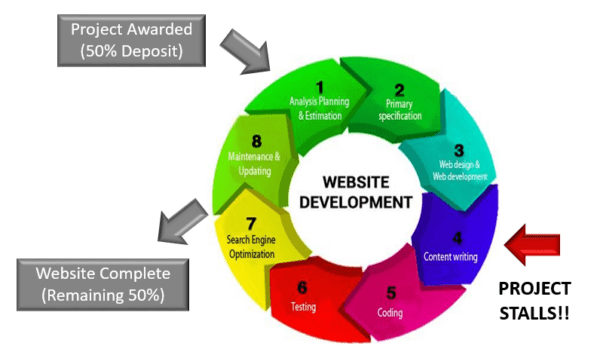
The graphic above shows the basic problem. This is the way we always used to do this work and 50% up front and 50% at the end just doesn’t work, especially with that content collection bottleneck right there in the middle. It has never really made sense to me that we wait till the very end to get paid.
What tends to happen is you get to the content part, and the client doesn’t deliver. So what most folks do is to say, “I’ll just go ahead and finish out the website. And then when they get the content together, I’ll just plop it in.” Unfortunately, when it comes time, and they never give you the content, or it just takes months and months and months, you never get paid – or getting payment is seriously delayed for work you have already done.
That’s never actually happened to me. But it has happened to many, many others who have their payment structure set up this way. The other thing that’s wrong with this graphic is that the stages of a web development project are not even, in terms of duration. In our methodology, the one that I use and the one I teach the students in the academy is that the biggest part of the project is actually in planning.
And then the development doesn’t take very long at all, if you plan it out the right way.
The Six Steps of Content Collection
Step 1 - Determine Your Initial Content Requirements
The best way to determine your initial content requirements is with a visual sitemap. I usually do this after the pre-proposal meeting with the client before I have done the estimate. So just by having the conversation with the client in your pre-proposal meeting, you can figure out what the pages are. And I use that list to create a visual sitemap. And I break this down into regular pages, gallery pages and product pages.
So I break it down into these three categories, because those are the ones that are the most different, you could break it down into even more detail. But at this point, I don’t want to put a lot of work in it. I’m just working on the proposal. So I break it down into those three page types.
Step 2 - Craft Your Initial Content Estimate
What??? Estimate content??? Yes, you need to estimate the content along with everything else, regardless of who’s carrying out the content activities.

So, why are you estimating content? Well, as I said, it is YOUR job to manage the project and you need to know how big of a job that is going to be. A rough order of magnitude can also be a selling tool. And it’s a good basis for your entire initial project estimate.
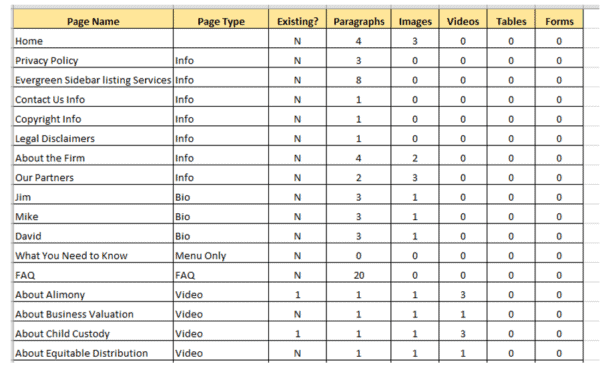
When I do this rough order of magnitude I use a spreadsheet that is available in the premium membership of the Academy (The Content Collection Roadmap) so if you’re a Premium Member, you don’t have to start from scratch. Basically, for each page of the website, you estimate how many paragraphs, images, videos, products, forms, and tables that will likely be on each page and estimate the time it will take to do each of them. It’s just a rough estimate along with any content you already know is available. And our spreadsheet does all the calculation for you.
Usually, before I craft the proposal, I validate with the client the pages we *think* we’re going to have on the site. I typically explain that I need a little clarification on the direction that they want to go. It is not unusual to make several follow up phone calls before the proposal.
One of the biggest advantages to creating the rough order of magnitude, and showing it to the client, is convincing the client they do not have TIME to do this. If you try to tell them they don’t have the skill to do it, they’ll always push back. But if you show them that they do not have time and that they need to be focusing on their business, then you have a much better chance of convincing them to let a third party (or you) complete the content activities.
Step 3 - Set Your Client’s Expectations Regarding Content
You need a written content management process AND you need to educate the client on that process. You need to be sure to stick to it, and explain it to your clients up front.
You also need to explain common content issues. Don’t be afraid to explain about potential problems. If you explain to them that there are the things we know that happen often on projects, and you have a way to manage them, that goes a long way towards establishing your authority, and making you look like a professional because you’re already being proactive about problems that you suspect are going to happen.
You also need to set the expectation that they might not be the best resource for this. You need to explain to them what happens if they don’t deliver it on time. Some folks put the project on hold and then if it’s on hold for a certain amount of time, the client must pay the project balance to start back up. Whatever your rules are, you need to explain them clearly to the client along with WHY you have the rule in the first place.
And consider offering a “prize” of some sort for meeting the dates. You can bump the estimate a few hundred dollars and offer a discount for compliance with the project plan. And it doesn’t always have to be money. Sometimes people will jump through hoops to get a sport shirt with a logo or a ball cap. You should decide on incentives on a client-by-client basis, but most of them are more interested in the bottom line.

Step 4 - Refine Your Content Needs
Once you’ve reviewed that rough order of magnitude with the client, you’ll get a sense of who they want to handle the content activities – themselves, a 3rd party, or you. This is going to have a bearing on your estimate. So that’s why you need to go ahead and assign those activities to whoever’s going to be doing them at this point.
Step 5 - Populate Your Content Collection Mechanism
Your Content Collection mechanism can just be paper and have them fill that out manually. I have done that before, with a small website with a very non techie client. It was just much easier to give them a stack of paper and they were happy to do it that way.
For online content collection, you can use products like Gather Content, Atarim (formerly WP Feedback), Integrify, SlickPlan, or my favorite, Content Snare. It’s a little time consuming to set up Content Snare the first time, but you can save things as individual templates and reuse them over and over. So in the long term, it really does make things way easier and faster. Content Snare was created by Jimmy Rose and his business partner. Jimmy is an expert in productivity and automation. He teaches a lesson on just that, inside the premium Academy membership.
Step 6 - Manage the Content Collection Activities
It’s your responsibility to manage all project activities, even those being completed by the client. Just like the client cannot hand off the website to you and then come back later and say, “Where’s my website?”, you can’t just hand content off to the client and say, “okay, come back on such and such a date with all the content.” There’s got to be some management going on in that process.
This step is where things usually fall apart.
- You want to make sure to break the job down for the client. You don’t want to send it all to them for all pages all at once. So when you do your project plan, you’re going to want to break that down into chunks. Maybe you do it one page at a time or you could even break it down into one section at a time that makes it really easy for the client.
- You want to ensure that the content is being delivered to the repository as scheduled. (Content Snare does that automatically.)
- You want to have regular status calls with the client, or some sort of reminder communication. It doesn’t necessarily have to be a phone call. But you want to find out what’s going on so you can track it to the project plan and make allowances for things beyond anyone’s control, like a sick child.
And then if there are signs that the dates are going to be missed, you want to invoke the change control process – immediately.
Content Collection Best Practices
Best Practice #1 – Build in Enough Planning Time
To ensure there is enough time allotted for discovery and to ensure we get paid for every bit of it, we use a 2-Step Proposal Process. Basically, we provide a range estimate in the initial proposal and position Phase 1 as the Deep Dive Discovery phase. And at the end of discovery, there will be a more precise estimate and the final approval of the planned website specification. We also establish a change budget that is ONLY used for change after the website specification (and new estimate) is approved.
This is what works for my agency and many of my students’ agencies. It really doesn’t matter if you fashion it exactly like this, as long as your proposal and discovery processes allow ample time for getting ALL the details, and discovering any changes to the initial proposal.
You can find out more details about the 2-Step Proposal Process inside the free membership to The WP Project Manager’s Academy or by watching the video attached to this article. You can also find out why ‘the pad is bad.”
Best Practice #2 – Restructure Your Payment Schedule
You need to abandon the 50%/50% payment model and structure the payment schedule so each phase is paid in advance. For example, our initial deposit covers ALL of Phase 1 – the discovery.
Some agencies will get a deposit at the beginning, then 30 days later a set payment amount, then 60 days later… and so on. They structure it out by time, but I do it by phase. So upon acceptance of the proposal, I get a deposit that covers all of that discovery phase, then at the acceptance of the statement of work (website spec), I get a percentage of whatever’s left, and usually I get 50% of whatever’s left. Then we wait for the client to provide the content and once they’ve done that, we get to deployment and testing. At the completion of testing, I again invoice for 50% of whatever’s left in the budget. At the completion of training, I get all the remaining funds. Notice that training comes BEFORE the site goes live. Getting the final payment before turning a site live is one of the biggest lessons you can ever learn. Do NOT give a client a live website until you have all the money.
Best Practice #3 – Embrace the Idea of a Minimum Viable Website
What is a minimum viable website (MVW)? This is where you start by launching a site that includes the “must-haves” and leave the “bells and whistles” for a separate 2nd project. This is another good example of breaking the job down (one of the 6 Productivity Principles for WordPress Project Success).
One example of when you might want to suggest an MVW to your client is when you suspect they may be overestimating their ability to provide the website content on time, but they want to get launched quickly. That way, it becomes two separate projects with two separate contracts and the client gets what they really need most in the shortest time possible.
Best Practice #4 – Structure the Project Plan for Content-First
You want to restructure your project plan for content first, something like this.
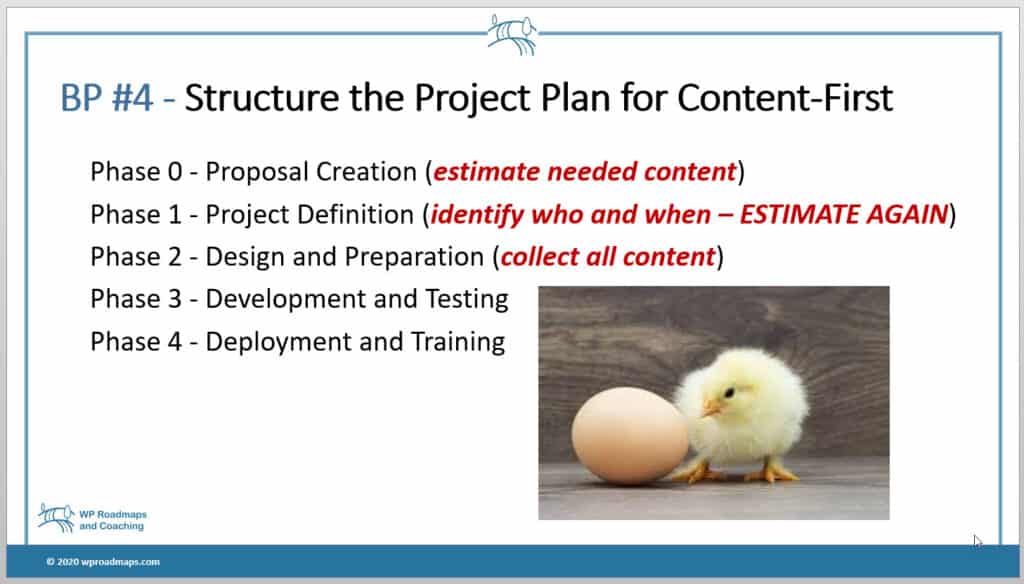
Your phases may fall out differently but the important thing is that you plan AROUND the content collection activities.
Best Practice #5 – Automate Where Possible
Here are some examples of where you can automate.
Visual sitemap – Slickplan (external tool)
I like that you can export it to a CSV, and then import it into my Rough Order of Magnitude spreadsheet.
Content Collection and Reminders – Content Snare, WP Feedback (now called Atarim)
Although both of these tools will work for automating the content-gathering process, one reason I prefer Content Snare over Atarim for this purpose is that I believe it is best to keep the content activities outside the website. If you try to combine design and content, it’s much more difficult to get the client to focus on ANYTHING but the design, and they need to be focused on the content at this point in the process.
Design Feedback – Atarim plugin
In our process, at this point, you’ve gotten the sitemap approved (number and types of pages) and after that, you got the layout approved (a spot for each bit of content). Once the content is delivered, we HIGHLY prefer Atarim for gathering feedback from the client. It allows them to click on different parts of the website and leave their comment right next to the element on which they are commenting.
Content Collection Summary
Among WordPress agencies and providers I have queried over the years, content collection is the number one thing they struggle with. By using a content-driven development approach, you can conquer this struggle using the 6 Steps of Content Collection and implementing certain best practices.
6 Steps of Content Collection
- Determine initial content requirements
- Craft initial content estimate
- Set client expectations regarding content
- Refine Content Needs
- Populate your content collection mechanism
- Manage content collection activities
Implementing Content First
- Use a 2-Step approval process
- Restructure your payment schedule
- Embrace the idea of a Minimum Viable Website
- Structure the project plan for “content first”
- Automate where possible
Disclosure: This post contains affiliate links that allow me to continue to offer this FREE content along with The WP Project Manager’s Academy.
Want to learn more on this topic and how to consistently get your projects completed on time and within budget?
Join the WP Project Manager’s Academy – a FREE membership program where you can learn everything you need to know to consistently get your projects completed on time, within budget, with features that meet the client’s business requirements WITHOUT sacrificing profit.

You might also want to Join our Facebook Group where we have weekly live trainings on all things project and productivity management as well as a Friday chat session.
